Creating an ETL data pipeline to sync data to Snowflake using Kafka and Debezium
Setting up a real-time data pipeline from scratch to sync data from transactional databases to Snowflake cloud warehouse.
In this post I will go through the basic steps to configure and get started with change data capture (CDC) from a source database and replicating the data into Snowflake cloud warehouse.

We will be looking at configuring and using Debezium for the change data capture and publishing the changes to a Kafka topic which then will be consumed into Snowflake using the Snowflake Kafka connector.
This will be a good solution for replicating transactional or operational database system to Snowflake cloud data warehouse for Analytics and Reporting needs.This will be a scalable solution since Debezium is built on top of Kafka.
In this exercise we will be using MySQL as a source database while we can do the same for most of the popular databases like Oracle, SQL Server, Postgres, Cassandra & MongoDB etc., to name a few.
I will be using Docker to describe the steps that can be used for testing this pipeline from you laptop. I would assume you have Docker installed in your system.
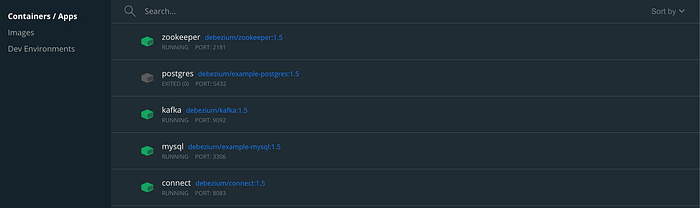
Running the Debezium inside docker, we will be running the below images from debezium inside docker.
These steps to start the services can also be found inside the debezium documentation. Please refer the documentation for more detailed notes.
https://debezium.io/documentation/reference/1.5/tutorial.html
- Zookeeper
- Kafka
- MySQL
- Kafka Connect
Start Zookeeper
docker run --name zookeeper -p 2181:2181 -p 2888:2888 -p 3888:3888 debezium/zookeeper:1.5Start Kafka
docker run --name kafka -p 9092:9092 --link zookeeper:zookeeper debezium/kafka:1.5Start MySQL Database
docker run --name mysql -p 3306:3306 -e MYSQL_ROOT_PASSWORD=debezium -e MYSQL_USER=mysqluser -e MYSQL_PASSWORD=magic debezium/example-mysql:1.5This MySQL from debezium contains an inventory database that can be used for this learning or we can create our own database and tables and register it to be monitored for changes.
Debezium does this by monitoring the database server logs to detect the changes and trigger events for changes that happens to the data/ row for the tables configured to be monitored.
Start Kafka Connector
docker run --name connect -p 8083:8083 -e GROUP_ID=1 -e CONFIG_STORAGE_TOPIC=my_connect_configs -e OFFSET_STORAGE_TOPIC=my_connect_offsets -e STATUS_STORAGE_TOPIC=my_connect_statuses --link zookeeper:zookeeper --link kafka:kafka --link mysql:mysql debezium/connect:1.5Registering MYSQL connector
We will POST a request to the Kafka connector API using CURL. This can also be done using tools like Postman. We are using localhost here but if the docker is running in a different host then use the appropriate host name
curl -i -X POST -H "Accept:application/json" -H "Content-Type:application/json" localhost:8083/connectors/ -d '{ "name": "inventory-connector", "config": { "connector.class": "io.debezium.connector.mysql.MySqlConnector", "tasks.max": "1", "database.hostname": "mysql", "database.port": "3306", "database.user": "root", "database.password": "debezium", "database.server.id": "184054", "database.server.name": "dbserver1", "database.include.list": "inventory", "database.history.kafka.bootstrap.servers": "kafka:9092", "database.history.kafka.topic": "dbhistory.inventory" } }'Below this JSON that we submit in the request
{
  "name": "inventory-connector",
  "config": {
    "connector.class": "io.debezium.connector.mysql.MySqlConnector",
    "tasks.max": "1",
    "database.hostname": "mysql",
    "database.port": "3306",
    "database.user": "root",
    "database.password": "debezium",
    "database.server.id": "184054",
    "database.server.name": "dbserver1",
    "database.include.list": "inventory",
    "database.history.kafka.bootstrap.servers": "kafka:9092",
    "database.history.kafka.topic": "schema-changes.inventory"
  }
}
A topic will be created for each table in the database so we can listen to the appropriate topic to replicate the table.
The topics would look like
dbserver1.inventory.customers
dbserver1.inventory.products
dbserver1.inventory.orders
If all the services have started and running fine the Docker desktop should look something like below with the needed services in green.
Configuring Snowflake Connector as listener to the topic
To connect to Snowflake we need to copy the Snowflake Kafka connector JAR and few dependent JARs to the debezium connect service.
I will be using the docker cp to copy the jar files from local into docker.
The JARs can be download from the below URL
Maven Repository: com.snowflake » snowflake-kafka-connector » 1.5.2 (mvnrepository.com)
Maven Repository: org.bouncycastle » bc-fips » 1.0.1 (mvnrepository.com)
Maven Repository: org.bouncycastle » bcpkix-fips » 1.0.3 (mvnrepository.com)
docker cp /Users/dpradeep/Downloads/snowflake-kafka-connector-1.5.2.jar connect:/kafka/libsdocker cp /Users/dpradeep/Downloads/bc-fips-1.0.1.jar connect:/kafka/libsdocker cp /Users/dpradeep/Downloads/bcpkix-fips-1.0.3.jar connect:/kafka/libs
Please refer to the below snowflake documentation for a detail configuration and download information.
Installing and Configuring the Kafka Connector — Snowflake Documentation
To make the service utilise the copied jars to the lib path the connect container needs to be restarted. Can also be done from Docker desktop
docker restart connectNow that the JARs are available we can register the listener to a specific topic that will listen and sync the changes to Snowflake.
Kafka Snowflake connection config JSON would look like below
{
  "name":"mysql_to_snowflake",
  "config":{
    "connector.class":"com.snowflake.kafka.connector.SnowflakeSinkConnector",
    "tasks.max":"8",
    "topics":"dbserver1.inventory.customers",
    "snowflake.topic2table.map": "dbserver1.inventory.customers:customers",
    "buffer.count.records":"10000",
    "buffer.flush.time":"60",
    "buffer.size.bytes":"5000000",
    "snowflake.url.name":"xxx.snowflakecomputing.com:443",
    "snowflake.user.name":"USER_NAME",
    "snowflake.private.key":"MII..........==", <into single line>
    "snowflake.private.key.passphrase":"YOUR_KEY_PASS_PHRASE",
    "snowflake.database.name":"DB_NAME",
  "snowflake.warehouse.name":"WAREHOUSE_NAME",
    "snowflake.schema.name":"DB_SYNC_SCEMA",
    "key.converter":"org.apache.kafka.connect.storage.StringConverter",
    "value.converter":"com.snowflake.kafka.connector.records.SnowflakeJsonConverter"
  }
}
We need a few things to be configured in Snowflake if not done earlier. The authentication is using a Key and Passphrase. This needs to be done. Please refer to the Snowflake documentation.
The role that the Snowflake user would assume on login should have the permission to create tables, stages, pipe in the above configured DB and Schema.
We are listening to just the customers table, if you refer to the topics we have configured in the above JSON. We can configure it for multiple tables.
Submitting the request for registering the Snowflake connector.
curl -i -X POST -H "Accept:application/json" -H "Content-Type:application/json" http://localhost:8083/connectors/ -d @kafka-snowflake-connect.jsonWe have saved the above JSON to a file named kafka-snowflake-connect.json and referring that in the -d parameter of the CURL.
Once this is successfully registered you can see the blow getting created in snowflake
Stage with the name -SNOWFLAKE_KAFKA_CONNECTOR_MYSQL_TO_SNOWFLAKE_STAGE_CUSTOMERS
SnowPipe with the name -SNOWFLAKE_KAFKA_CONNECTOR_MYSQL_TO_SNOWFLAKE_PIPE_CUSTOMERS_0
Table with the name - Customers in the configured DB and schema.
The created table will not be same as the source rather it will look something like below. With 2 columns metadata and content and will have JSON data

The JSON will have the before and after data for each column and the operation representing whether it is a Read, Update or Delete operation that triggered this event.
The are a few ways through which we can consume and merge this data and make the table look like source and will also handle the insert, update and delete. I will create a separate post and refer here shortly.
We are connect to the mysql terminal and update the customers table to see the changes are getting pushed
docker run -it --rm --name mysqlterm --link mysql --rm mysql:5.7 sh -c 'exec mysql -h"$MYSQL_PORT_3306_TCP_ADDR" -P"$MYSQL_PORT_3306_TCP_PORT" -umysqluser -pmagicIn the console run
mysql> UPDATE customers SET first_name='Anne Marie' WHERE id=1004;Now you can refer to the Customers table in Snowflake and you can see a new record with the operation as Update with the before and after values
A simple way to query the Customers table in snowflake can be like below
SQL — Snowflake
select value:id::string as id,
value:first_name::string as first_name,
value:last_name::string as last_name,
value:email::string as email
from customers c,
 lateral flatten (input => c.record_content:payload) cc
where cc.key='after';
We are just taking the after section in the JSON and selecting the columns.
Hope these steps helped in getting the basic of configuring the tool without any code to do a change data capture from a source database and moving the data into Snowflake. Since the kafka is extensible we are try out a lot of customisation and parse and load data.
Its almost similar if we have to configure Postgres as source. For using Oracle Xstreams (instead of the legacy logminer) for change data capture we need license for Oracle Golden Gate.
